Rain Heads for Downpipes and Box Gutters
Price range: $242.00 through $429.00 & Free Shipping
Description
Rain Heads for Downpipes and Box Gutters
- Free Shipping in Australia (Except NT)
- Colorbond or Zincalume
- Custom Made In-House
- Free Nozzle Included
Matt & Ultra Finishes – Additional $30 Automatically Added Per Item
**Understanding Rainwater Systems:
From Heads to Tanks**
Rainwater management is an essential aspect of building design and maintenance, particularly in regions prone to heavy rainfall. Properly managing rainwater not only prevents flooding and erosion but also offers opportunities for sustainable water usage. In this comprehensive guide, we will delve into various components of rainwater systems, addressing common questions, installation processes, and differences between different elements.
**What is a Rainwater Head?**
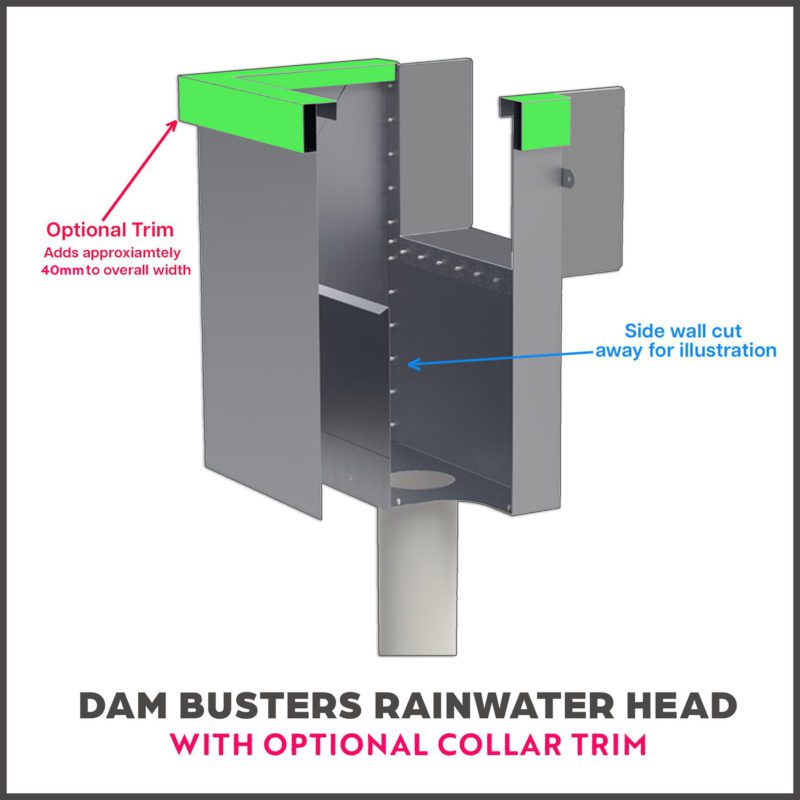
A rainwater head, also known as a rain head or collector head, is a vital component of a rainwater harvesting system. It’s typically installed at the top of downpipes or gutter outlets to collect rainwater and prevent debris from entering the drainage system. Rainwater heads come in various designs and materials, but their primary function remains consistent: to filter debris and direct rainwater efficiently into the downpipes.
**Installation Process of Rainwater Head**
Installing a rainwater head is a straightforward process, but it requires attention to detail to ensure optimal functionality. Here’s a basic guide:
1. **Preparation**: Begin by gathering all necessary tools and materials, including the rainwater head itself, brackets for mounting, screws, and a level.
2. **Placement**: Determine the ideal location for the rainwater head, typically at the top of downpipes or gutter outlets. Ensure it is positioned correctly to allow for efficient water collection.
3. **Mounting**: Use brackets to secure the rainwater head to the wall or structure. Make sure it is level to facilitate proper water flow.
4. **Connection**: Connect the rainwater head to the downpipe or gutter outlet using appropriate fittings and seals to prevent leaks.
5. **Testing**: Once installed, test the system by simulating rainfall or running water through the gutter to ensure proper functioning.
**Difference Between a Sump and a Rainwater Head**
While both a sump and a rainwater head are components of rainwater systems, they serve different purposes. A sump is typically a pit or reservoir designed to collect and store excess water, particularly in areas prone to flooding or where drainage is inadequate. On the other hand, a rainwater head is primarily a filter and collector, positioned at the top of downpipes or gutter outlets to prevent debris from entering the drainage system and to facilitate efficient water collection.
**Styles of Rainheads**
Rainheads come in various styles to suit different architectural preferences and functional requirements. Some common styles include:
1. **Traditional**: Traditional rainheads often feature a simple, utilitarian design, focusing primarily on functionality rather than aesthetics.
2. **Contemporary**: Contemporary rainheads incorporate modern design elements and materials, offering a sleek and minimalist appearance.
3. **Decorative**: Decorative rainheads come in ornate designs and may feature intricate patterns or motifs, adding a touch of elegance to the rainwater system.
4. **Integrated**: Integrated rainheads are designed to blend seamlessly with the building’s architecture, often concealed within the structure for a discreet appearance.
**Purpose of Rainheads**
The primary purpose of a rainhead is to collect and filter rainwater before it enters the drainage system. By preventing debris such as leaves, twigs, and insects from clogging the downpipes, rainheads help maintain the efficiency and longevity of the rainwater system. Additionally, rainheads can enhance the aesthetic appeal of the building’s exterior by providing a clean and unobtrusive solution for rainwater management.
**Purpose of a Rainwater Sump**
A rainwater sump serves as a reservoir for collecting excess water, particularly during heavy rainfall or flooding events. By temporarily storing excess water, a rainwater sump helps prevent flooding and erosion, reducing the risk of property damage and waterlogging. Additionally, rainwater sumps can be integrated into rainwater harvesting systems to store collected water for later use, contributing to water conservation efforts.
**Is a Rainhead Shower Worth It?**
Rainhead showers, also known as rainfall showers, have gained popularity in recent years for their luxurious and spa-like showering experience. These showerheads are typically larger than traditional showerheads and are designed to mimic the sensation of standing beneath a gentle rainfall. While rainhead showers can enhance the showering experience and add a touch of elegance to the bathroom, whether they are worth it depends on individual preferences and budget considerations.
**Height of Rainhead**
The optimal height for a rainhead depends on several factors, including the size of the shower enclosure, the user’s height, and personal preferences. However, a general recommendation is to install the rainhead at a height of 7 to 8 feet above the finished floor to ensure adequate clearance and coverage. This height allows for comfortable showering while ensuring sufficient water dispersion for an enjoyable experience.
**Sizing a Rainwater Head**
The size of a rainwater head is determined by factors such as the roof area, rainfall intensity, and desired flow rate. To size a rainwater head accurately, it’s essential to calculate the catchment area of the roof and estimate the amount of rainfall it receives. Additionally, consider factors such as gutter size, downpipe capacity, and local building codes when selecting the appropriate size for your rainwater head.
**Placement of Rainwater Head**
Rainwater heads are typically installed between the spouting and the downpipes to collect and filter rainwater before it enters the drainage system. This placement allows for efficient water collection while preventing debris from clogging the downpipes and causing blockages. Additionally, positioning the rainwater head at this location ensures that water is properly filtered before it is directed into storage tanks or discharged into the environment.
**Installing a Rainwater Tank**
Installing a rainwater tank requires careful planning and consideration to ensure optimal functionality and compliance with local regulations. Here’s a basic guide to installing a rainwater tank:
1. **Site Selection**: Choose a suitable location for the rainwater tank, considering factors such as accessibility, proximity to downpipes, and space availability.
2. **Tank Preparation**: Prepare the tank for installation by ensuring it is clean, level, and properly supported on a solid base.
3. **Connection**: Connect the rainwater tank to the gutter system using appropriate fittings and seals to prevent leaks. Ensure that downpipes are properly aligned to direct rainwater into the tank.
4. **Overflow**: Install an overflow pipe or outlet to prevent the tank from overflowing during heavy rainfall. The overflow should be directed away from the building foundation to prevent water damage.
5. **Plumbing**: Connect the rainwater tank to the plumbing system, including pumps, filters, and distribution pipes, to facilitate water usage for various applications.
6. **Testing**: Once installed, test the rainwater tank system by filling it with water and checking for leaks or any issues with water flow.
**Conclusion**
Rainwater management is a critical aspect of building design and maintenance, requiring careful consideration of various components and factors. From rainheads to tanks, understanding the different elements of rainwater systems is essential for effective water conservation and sustainable usage. By implementing proper installation techniques and maintenance practices, property owners can maximize the efficiency and longevity of their rainwater systems while contributing to environmental preservation efforts. Whether you’re considering installing a rainwater tank or upgrading your showerhead, taking the time to understand the intricacies of rainwater systems can help you make informed decisions and reap the benefits of sustainable water management.
Additional information
| Weight | N/A |
|---|---|
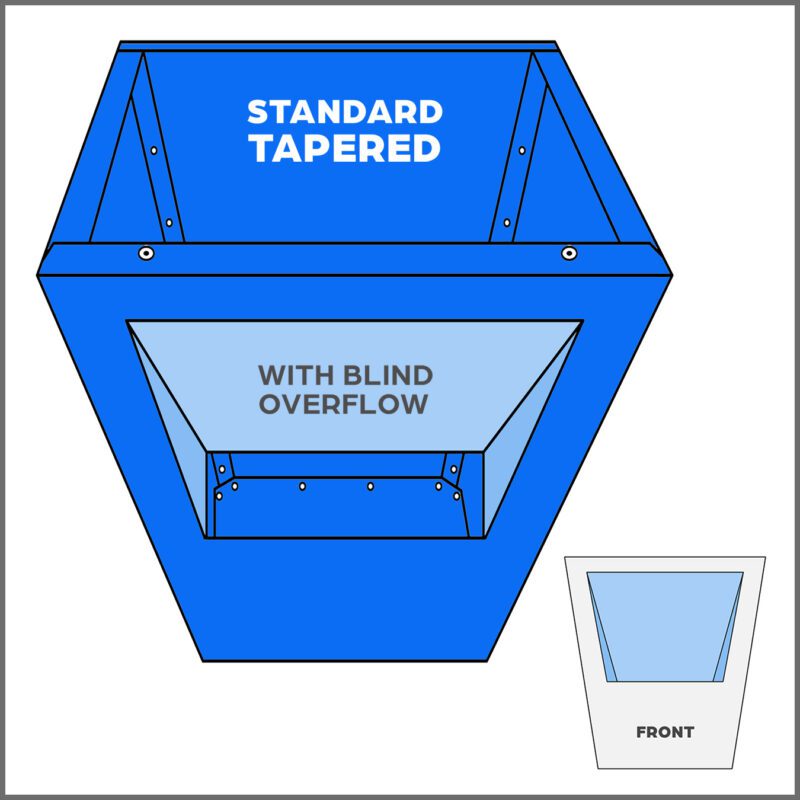
| Shape | Conical, Long Tapered, Ned Kelly, Rectangle, Rectangle + Collar, Rectangle + Taper, Rectangle + Taper + Collar, Square Rain Head, Tapered("Standard" Size Only) |
| Colour | Basalt, Bluegum, Classic Cream, Cottage Green, Deep Ocean, Dover White, Dune, Evening Haze, Gully, Ironstone, Jasper, Manor Red, Monument, Night Sky, Pale Eucalypt, Paperbark, Shale Grey, Southerly, Surfmist, Wallaby, Woodland Grey, Windspray, Zincalume, Matt Basalt, Matt Bluegum, Matt Dune, Matt Monument, Matt Shale Grey, Matt Surfmist, Ultra Dune, Ultra Surfmist, Ultra Shale Grey, Ultra Wallaby, Ultra Woodland Grey, Ultra Monument |
| Sizes | Standard, Medium, Large |
| Colorbond® Nozzle | 100mm Round – Included Free, 100×50 Rectangle – Included free, 100×75 Rectangle – included free, 90mm Round – Included Free, No Nozzle Required |
| Shipping to: | QLD, NSW, VIC, SA, WA, ACT, TAS |


