Whirlybird Roof Vent Installation: A Comprehensive Guide


Whirlybird Roof Vents Installation packages Greater Sydney Area – Click Here
Gutter Sumps to the Trade Shipped Free Australia Wide – Click Here >
Rain Heads to the Trade Shipped Free Australia Wide – Click Here >
Dambuster Rain Heads Shipped Free Australia Wide – Click Here >
Eco-Friendly Roofing Insulation Shipped Free – Click Here >
Introduction
A well-ventilated attic is crucial for maintaining the comfort and energy efficiency of your home. Whirlybird roof vents, also known as turbine vents or roof wind turbines, are popular solutions for enhancing attic ventilation. In this comprehensive guide, we will delve into the world of Whirlybird roof vents, covering everything from their benefits and installation to comparing them with other ventilation options and where to find reliable suppliers.
Part 1: Understanding Whirlybird Roof Vents
1.1 What Are Whirlybird Roof Vents?
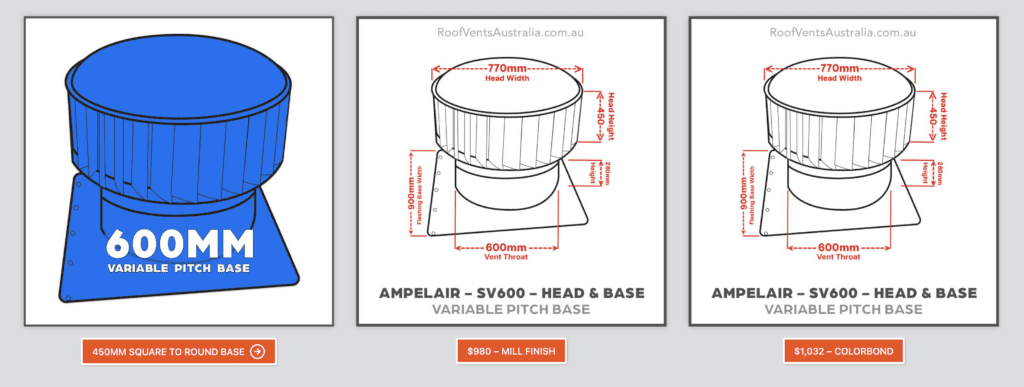
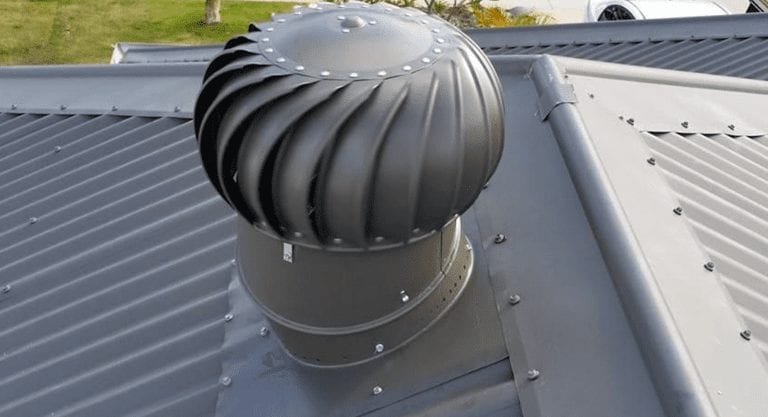
Whirlybird roof vents are passive ventilation devices installed on the roof to promote airflow within the attic space. These cylindrical vents utilize wind power to draw warm, moist air out of the attic and replace it with cooler, drier air from the outside. They consist of a series of rotating blades or vanes that spin when exposed to wind, creating a low-pressure zone that effectively exhausts hot air and moisture.
1.2 Advantages of Whirlybird Roof Vents
Installing Whirlybird roof vents offers several advantages for homeowners:
1.2.1 Improved Attic Ventilation
Whirlybirds enhance the attic’s ability to expel hot air and humidity, preventing moisture buildup and reducing the risk of mold and rot.
1.2.2 Energy Efficiency
By maintaining a cooler attic, Whirlybird vents can reduce the workload on your air conditioning system, potentially leading to lower energy bills.
1.2.3 Extended Roof Lifespan
Proper attic ventilation provided by Whirlybirds can help prolong the life of your roofing materials by preventing heat-related damage.
1.2.4 Environmentally Friendly
Since Whirlybird roof vents operate solely on wind power, they have no operating costs or environmental impact, making them an eco-friendly choice.
Part 2: Installing Whirlybird Roof Vents
2.1 Tools and Materials
Before you begin the installation process, gather the necessary tools and materials:
- Whirlybird roof vent(s)
- Roofing nails or screws
- Caulk or roofing sealant
- Roofing cement
- Roofing tar
- Roofing shingles (if needed)
- Hammer or screwdriver
- Measuring tape
- Safety goggles
- Roofing ladder or scaffolding
- Caulking gun
2.2 Installation Steps
Follow these steps to install Whirlybird roof vents on your home:
2.2.1 Choose the Right Location
Select a suitable location on your roof for the Whirlybird vent. It should be on the backside of your home, facing away from prevailing winds, to ensure consistent airflow.
2.2.2 Prepare the Roof
Use your roofing ladder or scaffolding to access the chosen location safely. Remove any existing roofing materials, shingles, or debris from the area.
2.2.3 Mark the Center Point
Mark the exact center of the installation location. This will serve as your reference point for aligning the Whirlybird vent.
2.2.4 Cut a Hole
Using your measuring tape and guidelines, cut a hole in the roof that matches the size of the Whirlybird vent’s base. Be cautious when cutting to avoid damaging the underlying structure.
2.2.5 Install the Vent
Place the Whirlybird vent over the hole, ensuring it’s centered and aligned correctly. Secure it in place using roofing nails or screws. Be sure to follow the manufacturer’s recommendations for fastening.
2.2.6 Seal the Edges
Apply roofing cement or sealant around the edges of the vent’s base to create a watertight seal. This prevents leaks and ensures the vent stays securely in place.
2.2.7 Replace Roofing Materials
If necessary, replace the roofing materials and shingles that you removed earlier. This step is crucial for maintaining the roof’s integrity and preventing leaks.
2.2.8 Test the Vent
Check the Whirlybird vent’s rotation to ensure it spins freely in response to wind. Make any adjustments if necessary.
2.3 Safety Precautions
When installing Whirlybird roof vents, safety is paramount. Always follow these safety precautions:
- Use appropriate safety gear, including safety goggles and a harness if working at heights.
- Ensure your ladder or scaffolding is stable and securely positioned.
- Work on a dry day to prevent slippery roof surfaces.
- Be cautious when handling tools and materials on the roof to avoid accidents.
Part 3: Whirlybird Roof Vents vs. Other Ventilation Options
3.1 Whirlybird vs. Ridge Vents
Ridge vents are another common attic ventilation solution. Let’s compare Whirlybird roof vents to ridge vents:
3.1.1 Installation
- Whirlybird: Relatively easy to install and suitable for most roof types.
- Ridge Vent: Requires cutting a continuous slot along the roof’s ridge, which may be more complex.
3.1.2 Airflow
- Whirlybird: Dependent on wind, providing passive ventilation.
- Ridge Vent: Works on the principle of natural convection, allowing hot air to rise and escape continuously.
3.1.3 Maintenance
- Whirlybird: Minimal maintenance, primarily checking for debris or damage.
- Ridge Vent: Requires occasional inspection and cleaning to ensure proper airflow.
3.1.4 Cost
- Whirlybird: Generally more affordable in terms of initial installation.
- Ridge Vent: May have a higher upfront cost due to materials and labor.
3.2 Whirlybird vs. Gable Vents
Gable vents are installed in the gable end of an attic. Here’s how they compare to Whirlybird roof vents:
3.2.1 Installation
- Whirlybird: Installed on the roof, suitable for various roof styles.
- Gable Vent: Installed in the gable end, may require modification of the attic structure.
3.2.2 Airflow
- Whirlybird: Utilizes wind power for passive ventilation.
- Gable Vent: Depends on natural convection and may require wind to create airflow.
3.2.3 Aesthetics
- Whirlybird: Less obtrusive on the roofline.
- Gable Vent: Visible on the exterior and may impact the home’s appearance.
3.2.4 Effectiveness
- Whirlybird: Can provide more consistent airflow due to roof placement.
- Gable Vent: Effectiveness may vary depending on attic design and wind direction.
Part 4: Finding Reliable Whirlybird Suppliers
When considering Whirlybird roof vents for your home, it’s essential to source them from reputable suppliers. Here are some tips for finding reliable suppliers:
4.1 Online Research
Start your search by researching Whirlybird suppliers online. Look for suppliers with a well-designed website, detailed product information, and customer reviews. Online forums and home improvement websites can also provide valuable insights into supplier reputation.
4.2 Local Building Supply Stores
Visit local building supply stores or home improvement centers. They often carry a selection of roof ventilation products, including Whirlybird vents. Discuss your requirements with their knowledgeable staff and inquire about product warranties.
4.3 Manufacturer Websites
Consider buying Whirlybird roof vents directly from manufacturers. Many reputable manufacturers have official websites where you can find comprehensive product information, warranty details, and contact information for inquiries.
4.4 Recommendations
Seek recommendations from friends, family, or contractors who have experience with Whirlybird roof vent installations. Personal referrals can help you find trustworthy suppliers.
4.5 Verify Certifications
Check if the supplier’s products meet industry standards and certifications. For roof vents, look for products that are UL-listed or have other relevant certifications for safety and performance.
4.6 Request Quotes
Contact multiple suppliers and request quotes for the specific Whirlybird roof vent model you need. Compare prices, warranties, and customer service before making a decision.
Conclusion
Whirlybird roof vents are effective and eco-friendly solutions for improving attic ventilation. Proper installation can help enhance energy efficiency, protect your roofing materials, and maintain a comfortable indoor environment. When considering Whirlybird vents, take the time to research and find reputable suppliers, and consider the benefits compared to other ventilation options. With the right information and precautions, you can enjoy the advantages of a well-ventilated attic while contributing to a more energy-efficient home.


